
This post considers a variety of factors that may come to mind, for the cyclist who is wondering whether and how to carry cargo on his/her bike. Read the whole thing if you have time, or just browse sections of particular interest.
(Note: the title’s reference to “full kitty” means having a bike equipped with four panniers made from plastic buckets originally filled with kitty litter. The “backpackrack” is the concept of a back rack, with optional plastic crates bolted on top, sufficiently wide and long to accommodate a full backpacking backpack, whether empty (i.e., with its contents in the panniers for a lower center of gravity while biking) or full (e.g., as a temporary replacement for a broken pannier.)
Contents
Introduction
DIY: The Framing Material
Fasteners
Weight Distribution
Weight-Bearing Points on the Frame
Aerodynamics
The Trailer Alternative
Processing the Information
A Possible Next Step
.
Introduction
I was thinking about doing some distance riding. I started with the belief that I was going to simply supplement or replace the rack on back of my bike. It looked like this:

The rack worked for attaching panniers and carrying cargo. But it had some imperfections:
- I sold my panniers, partly because they would ride forward and hit my heels as I pedaled. I could buy replacements — Arkel and Ortlieb seemed to be most commonly recommended, but there were others — but good ones tended to be expensive.
- I was now thinking of trying square kitty litter bucket panniers. To attach those further back, I probably would have had to extend the rack, add some kind of bottom attachment fixture for them, and add a midlevel bar to prevent them from swinging into the rear wheel.
- On top, the rack was too short for long cargo. In the case of my tent, this was not such a problem: I could rope down the front of it, and the rear end would just hang out over empty space behind the bike. But my backpacker backpack was way too long and wide for that little surface.
- The rack used two upright aluminum tubes on each side to support the horizontal platform on top. This was fine, but I worried that it wasn’t sufficient for heavy loads, whether placed on top or in the panniers.
- The rack was old. I had used it on my previous bike, starting in 1999; and on that previous bike I had used it for a fair amount of bike camping, and also for carrying a 22-lb. dog inside a plastic pet crate. People said that aluminum bike frames could still hold up for years, and in most cases that was probably true. But this rack wasn’t as strong as a bike frame. Where the rack had been subjected to a lot of bumps while carrying heavy loads, I was worried about metal fatigue. At least one source did report experiences of similar racks failing.
I hadn’t yet sorted out my biking plans. I didn’t need the rack to be able to carry an adult passenger. But if history was any indication, it was likely that my rack would have to stay solid through many miles of bumpy roads. There was also some chance that it could be hauling heavy grocery loads consisting of many pounds of liquids (e.g., milk, bottled water, juice) and canned goods, in the panniers and/or on top.
So I shopped for alternatives to my existing rack. CyclingAbout offered a list of racks that would set the panniers further to the rear. Most of them ranged from $120 to $240. The Ibera PakRak Touring Bike Carrier Plus was an exception at $28 at Walmart and Amazon — but, like many other racks, it had a bent-up rear bar that would interfere with my desire to provide an extended flat surface for longer cargo items. Also, while its limit of 55 lbs. was not lightweight, I was not sure it would be enough.
DIY: The Framing Material
So I decided to build a replacement. I browsed for a while, found 1 2 prefabricated front racks that seemed capable and inexpensive, and was particularly interested in the possibility of adapting Ann Rappaport’s shelving-steel front rack design (shown here) to the rear of the bike.

Preliminarily, I decided not to do that, for several reasons:
- I was not sure whether long pieces of those steel shelving supports would be stable and would support heavy weight.
- Her approach required a lot of drilling. It would be necessary to measure precisely, so that the holes were in exactly the right place. That wasn’t a killer, but it did seem likely to make it more difficult to tinker with the fit. In her description, parts of the measuring process required two people.
- I was hoping for materials that would form more of a support for the bucket panniers from underneath, so as to reduce the eventual breaking of the plastic bucket panniers that Brian Huntley encountered, when he used hooks to hang the panniers onto the rack.
- If I did take Huntley’s route, or if I decided to replace the plastic buckets with more traditional panniers, Ann’s shelving supports would be too thick to accommodate pannier hooks.
- Ann used machine screws. Those were arguably better-looking than bolts. But it looked like some of the nuts were inside those C-shaped steel brackets and, as such, might not permit wrench-tightening. Thus, she could tighten only as tightly as permitted by the screwdriver’s hold on the screw. She said that, as of 2015, the nuts had held tightly for the intervening seven (?) years, thanks no doubt to her use of lockwashers and locknuts (and, someone said, Loctite). She didn’t say how often or how heavily she had loaded it, or what kinds of roads she was using. In sympathy with some of the people commenting on her post, I had to be concerned that her design, evidently suitable for the loads that a front rack could tolerate without causing major steering difficulties, might eventually rattle apart under a heavy rear load.
I revisited those thoughts when I looked for the kinds of shelving supports that Ann used. I was hardly finding them at this point. The in-house search tools at HomeDepot, Walmart, Amazon, and Lowe’s all made it difficult to locate anything like this. Terms like “support,” “upright,” and “bracket,” used with or without “shelving” or “shelf” and/or “wall” or “book,” led to a lot of irrelevant stuff. Eventually I would find that these pieces of hardware are called shelving standards. An in-person visit to Lowe’s did uncover some (although only in white) in two-foot, four-foot, and six-foot lengths, at prices of about $1.10 to $1.20 per foot. The best source, as it turned out, was my local hardware store. I thought it might be better to use wider shelving standards providing two parallel sets of slots. There were more choices here, and they looked stronger.

Online, through variations on my own Google search, I did find a selection of these two-slot uprights, under brand names such as Elfa, Style Selections, ClosetMaid, Rubbermaid, and Blue Hawk. The one shown here was from a 70.5-inch Style Selections item, priced at about $1.70/foot at Lowe’s. HomeDepot’s white ClosetMaid offerings were in that range as well and, who knows? I found things in the store that weren’t listed on the website, so maybe HomeDepot had black as well. Online, a nonwhite alternative was a 70″ Rubbermaid upright in satin nickel color, at about $2.11/foot.
A rack made of those two-slot uprights would still have had some of the drawbacks noted above. I tentatively decided to go with an uglier solution. Its aesthetic debility was not necessarily a weakness for my purposes: on a long-distance trip in an unfamiliar location, I might not mind having a rig that didn’t look worth stealing, or stealing from. Specifically, after fondling various items of hardware in Home Depot, some of which would facilitate the heavy-duty rack design favored by Paul Woloshansky, the ugly material I selected as my preferred weapon was 1.25″ pre-drilled, zinc-plated 18-gauge angle steel, at a price of $2.12/foot:
The edges on the raw piece weren’t sharp, but the edges on my own cuts probably would be. The ends might call for some grinding and filing, to remove sharp corners. This item was not nearly as rigid as, and was also not necessarily cheaper than, solid angle iron. But it was much lighter, and would not require the potentially difficult drilling that angle iron would require. Also, its chemically bonded zinc coating would reportedly be quite weather-resistant (except where scratched or cut), not needing and (for better or worse) actually not very friendly to paint.
In my handling, it also seemed that this material would be more warp-resistant than any competitively priced aluminum angle or tube product. The pre-drilled (more likely, pre-punched) holes and slots would facilitate bolting, bungeeing, and cabling items onboard at random. Except where the angle of the L was favorable, ropes and straps would work only for brief use; otherwise, I would have to add eyebolts or other accommodations. It seemed that a really tightly cinched rope could warp this thin angle steel.
Contrary to my pannier dream, the L shape of the metal was strong, but not necessarily strong enough to reliably support a heavy weight without tending to straighten out (i.e., to become less like an L and more like an I). I would probably want to reinforce the L in those cases. But that could be done. By contrast, making Ann’s steel uprights thinner (i.e., to accommodate pannier hooks) could not be done, at least not without greatly weakening them. Predrilled square steel tubing would have the same drawback — not to mention the fact that my local Home Depot and Ace Hardware had none in stock.
Overall, that slotted angle steel material had, for me, the crucial advantages of being light, strong, and easy to assemble and adjust, as I tried out various configurations and discovered unexpected problems. No doubt I would eventually work through the issues and come up with precise measurements that someone else, with my bike and my needs, could translate into a precisely drilled rack built of shelving steel, angle iron, or aluminum tubing. But I wasn’t there yet. I was still trying to visualize how this was all going to work.
Fasteners
Ann’s design had the advantage of using small nuts and bolts. Those would be lighter and less expensive. They would also be consistent with the frame-mounted metric screw fixtures available on this and other bikes: those screws were not large. In that sense, rack fasteners of a larger size would be overkill.
Unfortunately, I would not have the option of using small bolts or screws, unless I wanted to change my mind about using pre-drilled steel. Small bolts would have fallen through the large slots and holes on my angle steel. Fender washers (i.e., large washers with small holes) would prevent that, but they would still let small bolts slop around inside the large openings on the angle steel.
For the best fit, on this prepunched steel, I found that I would have to use 3/8″ bolts for the round holes and 5/16″ bolts for the oblong slots. As a second best, it looked like there actually wouldn’t be much slop if I just used 5/16″ bolts for everything. Of course, a bolt could slide, in an oblong slot, so it would have been better to use only the round holes. But I couldn’t be confident that that would be feasible in all cases. In my pieces of angle steel, the round holes were arranged in a pattern putting them as much as 2″ apart. I would have to try, instead, to cut and position the pieces of this frame so as to minimize slop.
My chosen 5/16″ fasteners would assist with that in one sense: it would be possible to tighten them very firmly. It had been a while since I had sheared a bolt by overtightening, but it seemed to me that 1/4″ bolts were much more vulnerable to that than 5/16″ bolts.

My visit to Home Depot reminded me that we were no longer living in the heyday of Rust Belt steelmakers, when nuts and bolts were dirt-cheap. Home Depot did let me buy my fasteners in single quantities, instead of boxes containing 50 or 100, most of which I would never use. Sadly, though — looking at the photo here — the bolts, flat washers, lockwashers, and regular hex nuts were, respectively, $0.16, $0.11, $0.15, and $0.11 each. Locknuts were the exception: I had to buy 15 for $1.70 (i.e., $0.11 each). Hence, regardless of whether I ultimately used locknuts, every fastener point would cost $0.53. And then, of course, there was the Loctite, recommended both online and in the store for my particular purpose: $6.47. Plus tax.
I didn’t price those items extensively. Fastenal and eBay didn’t look much cheaper. I might have been happier with bolts measuring 5/8″ rather than 3/4″ in length, but the former were not in Home Depot’s selection onsite, and I wasn’t inclined to scour the countryside for this. If I’d known what I was looking for, I might have located some of these items at a recycling center. Some people might know of a farmer or handyman who could offer a pile of bolts to pick through.
Altogether, including two 6′ pieces of angle steel, I came home from Home Depot with my load lightened by a total of $47.94. That included more fasteners than I would likely need, and it also seemed unlikely that I’d be using a dozen feet of steel in this back rack. So, after store returns (or, if I chose, after applying the excess to a front rack), it seemed I might not be too much more in the red than if I’d bought a premade rack that wouldn’t do what I wanted. Not counting time and labor, that is.
Weight Distribution
When I made that trip to Home Depot, I thought I had a fair idea of how much I was going to carry, and where I would be carrying it. Further research caused me to reconsider.
I had already seen that people who wanted to carry very heavy loads were advised to buy a trailer or a cargo bike. The latter could cost $1,200 or more — but at least it would tend to have brakes designed to stop a heavy load while flying downhill, as well as a steel frame suited for the load.

Surly Big Dummy (that’s the type of bike)
My own city riding had taught that traffic was much reduced between midnight and 5 AM — starting earlier on Sunday nights and later on Friday and Saturday nights. I also believed that distracted and psychopathic drivers would pay more attention to a bike whose bulky rear profile suggested that it might scratch or dent their cars if they hit it. Swinging out far enough to avoid plastic bucket panniers would tend to mean avoiding my handlebars as well. People said you could get used to carrying a lot of cargo.
My idea was that the visibility of a bulky rear profile (at the expense of increased wind resistance and vulnerability to crosswinds) might be enhanced by following the usual weight-distribution advice — for best balance, put the heavy stuff down in the panniers — with the addition of two plastic crates, turned sideways, on top of the rack, to carry light and loose things (e.g., sleeping bag, jacket, potato chips). Then I could put my big, empty backpacker’s backpack on top, and strap long items (e.g., tent) to the sides of those crates.
Multiple sources advised putting some of my load on the front of the bike. It seemed to be uniformly agreed that, for purposes of balance and ride comfort, front and back racks and loads needed to be stiff, not flopping or waving around. This, and low weight capacity, seemed to be the primary arguments against rear racks that attached only to the seat post: apparently it was hard to prevent them from bobbing up and down in a disconcerting and potentially destabilizing manner.
In front, especially, apparently it was important to have an equal left-right load. Somewhere, I saw an indication that, for purposes of steering stability, it would be better to use a frame-mounted front rack that would not turn with the handlebar. For instance, Fr8 offered bikes with that sort of rack, contributing to an estimated total load capacity of about 550 lbs. Otherwise, it seemed that weight on a front rack could be destabilizing, while weight in low front panniers could contribute to stability, though someone pointed out that snagging one of those low front panniers would mean an immediate trip to the pavement.
I wasn’t yet at the point of designing my front rack. But I was surprised to encounter indications that 60% of the total load should go on front. For instance, a search led to several interesting Adventure Cycling Association (ACA) articles:
- Schubert (2009) cited experiments in the early 1980s concluding that, “unless you’re carrying a total load of around 15 pounds or less, you should use a combination of front and rear racks.”
- Heine (2009) argued that, in principle, a front load is easier to balance than a rear load, but that, in practice, few bikes are designed for a heavy front load.
- ACA’s “Tours Department” (2007) said, “Your bike will be most stable if you put more weight in your front panniers–roughly 60 percent of weight in front and 40 percent in back.”
Other sources agreed that having weight in front — especially carried in low panniers — could enhance steering stability, and that heavy loads in back, combined with the rider’s weight, would stress the rear wheel. Among many interesting comments in one long discussion, for instance, I saw remarks echoing what I had experienced: I would definitely want some weight in front if I had a lot of weight in back, and especially if that weight was back of the axle; otherwise, going up hills, I could find that the front wheel (and, oops, the steering) could tend to lift off from the pavement.
Several participants in that discussion affirmed ACA’s 60-40 preference for front loading. With memorable phrasing, one of them spoke of “having a [heavily rear-loaded] bike go into a death wobble and wandering all over the road during a 40+ mph downhill.” Others questioned whether that would happen with a normal rear load. I had never carried a front load, and it hadn’t yet happened to me. But I wasn’t sure I’d ever gone 40+ MPH with that kind of load, either.
That extended discussion included a lot of talk on the endlessly fascinating questions of what to pack, and where to pack it. After all, if you could get by with 14 lbs. of cargo, as one person claimed, that would tend to challenge the need for big panniers and heavy steel racks. But if your idea of affordable ultralight packing was $1,500, some (myself included) might reconsider the concept. We could be talking about, among other things, the difference between a tent from Walmart and a backpacker’s tent costing five or ten times as much that (voice of experience, here) would be more attractive to tent thieves (which I didn’t know existed, until I camped in the vicinity of Texas). Pete Staehling (2011) offered an appealing vision of inexpensive, low-weight touring, but at present his simple cargo load seemed far from what I believed I would need on an extended bike camping trip:

Some participants in that discussion challenged the Blackburn research of the early 1980s, with its conclusion that front panniers facilitated the best handling: critics noted that Blackburn had a vested interest in selling front panniers. In the discussion thread, a number of participants expressed doubt that it really mattered. Some said that front panniers introduced a surprising amount of additional wind drag. (See a huge BikeForums thread for more pictures of loaded bikes.)
CyclingAbout (Alee, 2016) discussed a number of individual, subjective tests of bike handling under various loads and conditions (e.g., short or long rides, city or dirt road, climbing and descending), and concluded that rear loading was better in most cases. In Alee’s view, the main factors favoring front panniers were (a) dirt-road riding, (b) hardware (especially wheels) not designed for heavy rear loads, and (c) inadequate heel clearance for rear panniers. I noted that having both front and rear panniers would tend to eliminate the option of locking the bike into a standard bike parking rack — which, in some places, would be the only permitted place to park — unless there happened to be space on the end.
Weight-Bearing Points on the Frame
As just noted, Alee (2016) raised the question of whether my bike hardware was capable of carrying heavy loads. I liked my aluminum-framed Trek 7.3 — but already, after five years of actual riding, at an average of maybe 1,000 miles per year, virtually never going offroad or carrying any rear cargo, I had replaced the rear wheel once, on the advice of sources indicating that failure of multiple spokes meant the wheel was on its way out. Comparing that relatively skinny hybrid tire and wheel against the sturdier hardware of mountain bikes and cruisers, it was not hard to imagine what could happen when a heavy load (on either front or rear) met up with the inevitable potholes that (partly due to load) I would not be able to jump or avoid at the last moment.
The story was much the same as I compared my heavy 5/16″ steel bolts (above) against the little M5 screws and the bike frame’s mount points (also called bosses, eyelets, or braze-ons) that those screws would screw into. Those little screws, and their rather delicate mount points, would be carrying the weight of the rack, panniers, and cargo. It was not hard to see that, even with a moderate load, I would be concentrating a lot of weight, and a lot of force, upon a few rather small focal points, every time I hit a crashed or hit a pothole, and even when the loaded bike simply fell over. According to one source, the screws themselves could shear. The mount points were not steel, as I verified with a magnet. Maybe they were made of an alloy. Even so, I had to take seriously the remarks by Arctos, in one Bikeforums discussion, and djb, in another, alleging that such points had indeed been known to break off.
It seemed that I would want to distribute the weight across multiple mount points, if possible, so that no one of them would have to absorb the force of a heavy weight suddenly pounding, twisting, or coming to an immediate stop. The question at hand, then, was this: how many mounting points do I have?
For a back rack, the mounting points could only be down below or up ahead — that is, down around the rear wheel, or forward around the seat post. There were the mounting points that Trek, the bike manufacturer, had welded into the frame, and possibly there could be additional attachment points that I would devise.
To sort this out, I saw an excuse to learn how to use Photoshop to convert a photo of my bike to a line drawing. A tutorial by Helen Bradley helped. Unfortunately, for purposes of that process, it seemed that I should have taken my photo with a blank background. All that stuff in the garage complicated things. So instead, in Photoshop, I just drew a layer with black lines, and added the lengths of the relevant frame sections:

To translate, this drawing provided the following information, starting at the top right, and using the terms provided by Wikipedia and StackExchange (see also RCUK):
- The top tube (a/k/a crossbar), running from the head tube (i.e., the vertical front tube connecting the front fork to the handlebars) to the seat tube, measured 22.6″ (i.e., 22.6 inches long).
- I didn’t measure the down tube (i.e., the tube running from the handlebars to the crank) or the chainstay (i.e., the bottom horizontal frame tube running, on each side of the bike, from the crank to the rear axle).
- On each side of the bike, the seatstay (i.e., the frame tube that angled down from the seat post to the rear axle) measured a total of 20.5″ long. Of that, 4″ was above the forward rack mount (i.e., the bolt where the existing rear rack connected to the upper rear part of the frame, below the seat), and 16.5″ was below that mount.
- As indicated by the dashed pink lines in my line drawing, the forward rack mount bolt was on a level 13.3″ above the rear axle, and the top of the back rack was another 2.2″ above that level.
I included the top tube measurement because there was the possibility of using it as a support for the back rack. It seemed that, if necessary, I could lash a piece of sturdy flat steel to that tube, run it back past the seat post, and possibly use it as the foundation for a back rack. I did not pursue that possibility because
- The front tube sat at an angle, and its vector (i.e., the line of its direction) behind the seat was too high for optimal back rack load stability. I could have used a drop-down piece of steel to lower the forward rack connection point on that top tube extension, just as there was a drop-down connection from my present rack to the forward rack mount bolts, but it seemed like that would have compromised some of the extension’s stability and weight-bearing usefulness.
- I did not immediately see a way to firmly attach that steel to the top tube, so as to prevent it from moving around unhelpfully. Perhaps I could have connected it to a cross-piece lashed to the seat tube.
- While this sort of top tube extension would ideally be capable of supporting far more weight than the forward rack mounts, I doubted that my loads would require that degree of support.
- Even if I had run flat pieces along both sides of the top tube, they would have emerged behind the seat within a few inches of each other. They would probably be too close together to provide much lateral stability.

Another possibility was to use P-clips or U-bolts to create mounting points on the rear frame sections — either the seatstay or the chainstay, or both. Notwithstanding Ann’s design (above), even with rubber tubing around the metal shaft, I was hesitant to use U-bolts because, especially on an aluminum frame, it seemed they could permit excessive torque when tightened, sufficient to crush the frame segment and ruin the bike. While P-clips might have been useful for hanging things from a bike frame tube, I was not confident that they would be strong and stable for purposes of keeping weight from pushing down into or past a frame tube. I thought about combining P-clips on both of those frame pieces for added strength and stability, but it turned out that this would be possible only on the left side of the bike. On the right side (a/k/a the drive side), the derailleurs would have the chain moving back and forth above the chainstay, conflicting with any rod or other supporting piece that I might have attached to the chainstay.
It seemed, then, that my best options were pretty much limited to the potential mount points provided by the manufacturer. These consisted of the forward rack mounts, and the lower rack and fender mounts, down near the axle. Using the axle probably would have been essential, if I had intended to carry something as heavy as a passenger. Otherwise, though, I wouldn’t want to attach the rack to the axle, because I wouldn’t want to have to deal with it when repairing a flat. I also wasn’t sure whether the existing axle would be long enough, or whether adding a rack support to the axle would cause other unexpected complications.
That left the lower mounts. On the left side, there were four of these: the lower rack and fender mounts, and two unthreaded eyelets that looked almost large enough to accommodate a quarter-inch bolt. Regrettably, for some reason those unthreaded eyelets were not matched by similar eyelets on the drive side. It would still have been possible to use them asymmetrically, as weight-bearing contributors on the left side only, but I didn’t want to do that. So we were down to the lower rack and fender mounts, plus the forward rack mounts, on each side.

If the bike had been shaped differently, I might also have been able to create a new mount point behind the axle. This would have called for lashing a piece of steel or aluminum to the chainstay (with, perhaps, a P-clamp), running it horizontally back past the axle, and running a support upwards from it to support the rear end of the rack. That horizontal chainstay extension was not feasible here because the axle lay in its path. That extension might also have been a problematic candidate for lower support of the bucket panniers, because the chainstay (whose vector it would have followed) was not really horizontal: it angled upwards and outwards as it approached the rear axle.
An alternate rearward extension might have started with a connection to a vertical frame addition, inserted just ahead of the axle. This extension could have proceeded rearwards horizontally from that frame addition, passing above the rear axle, near the unthreaded (upper) eyelets. One problem here was that I could not visualize what would keep that frame addition stable and weight-bearing, unless maybe it would consist of a heavy steel plate held in place with U-bolts. Also, on the drive side, there was again the problem that it looked like this addition would interfere with the chain and the rear derailleur. In addition, the rear derailleur cable traveled down the outside of the drive-side seatstay, and thus seemed likely to conflict with the seatstay attachment to this hypothetical plate.
In short, it seemed that the weight of cargo on the rack would have to be borne by the bike manufacturer’s rack and fender mounting points: the forward rack mounts, up below the seat, and the lower rack and fender mounts, down by the rear axle. At a minimum, there would be a vertical support running up from the lower rack mount, and a horizontal piece of angle steel running rearwards from the vicinity of the forward rack mount. To distribute weight, I would probably also want to run a support up, at an angle, from the lower fender mount to the rear of the rack. For that rearmost support, it seemed the angle steel that I had bought might not be the ideal material. It might force the panniers to stick out too far to the side.
Later, it would occur to me that maybe I should mount the back rack on the axle, instead of using those frame eyelets. I posted a question on that. That forum did not allow me to post links, so here’s the more complete text of what I posted there:
Gerryl — good call re Axiom: e.g., Streamliner Road DLX. But there’s still a need for the DIY approach in this case.
Dabac — I hear you re loading weight on threads. But that’s the way the bike already is (see photo): the frame rests on the axle threads. Granted, the threads on a longer thru-axle may be burred beyond redieing, if I remove the rack. But if the weight is largely borne by friction, as you say (and I think you’re right), it shouldn’t be that bad. In any case, I’ll deal with that when/if that day comes.
Re: wrenches: this may be a job for the bike shop. Dreaded words, for a man on a budget, but it doesn’t hurt to ask them. I’ll report back if I get anything noteworthy there.
Dabac and BradTX — I was concerned that skewers don’t seem to be designed to bear weight. I see, for instance, that BOB trailer skewers bend sometimes (frequently?) from trailer weight/pulling. Some seem to feel that a little skewer bending never hurt anybody. But I think the bending is being arrested by the wheel’s aluminum hub. OK if it works, I suppose, but possibly not a great situation from an engineering perspective.
BradTX — I hadn’t thought of drilling and, optionally, tapping my own. It’s a possibility. I’d still rather transfer the weight directly from the rack to the axle if possible.
It occurs to me to wonder how they deal with such things on cargo bikes. A search on that leads me back to Old Man Mountain: $70 for a thru axle! At that price, I’ll just use Uber.
Meanwhile, however, this impression of the situation provoked me to take a moment for review.
Aerodynamics
I had begun with a pretty simple concept. I had a bike; I wanted to give it a beefier back rack. But by now, I had acquired enough information to identify two different visions of what I could be doing. One approach would be to take off on a camping trip with a lightly loaded bike, shedding weight and eliminating items that would impose significant wind resistance. If I wanted to use the bike to haul groceries or other cargo near home, I could attach a trailer, especially in the off hours, when traffic would be minimal. The alternative approach would be to equip the bike to carry relatively heavy and/or bulky cargo. In this case, there was a question of whether to replace my aluminum-framed Trek hybrid with a Schwinn, or some other steel-framed Walmart bike, or something a little more expensive, that would be expendable, weldable, and/or capable of handling the load without problems.
So far, I had been thinking that, yeah, a loaded bike would be somewhat slower. But now that I had been reading about various problems with weight and wind resistance, I wanted to know what kind of difference we might be talking about. I had seen the pushcart guys with their heavily loaded trikes in the city, moving at barely more than a walking pace. Was it going to come to that? Although, not to knock it: one source pointed out that, on a trike, you could go uphill at 2 MPH, if that’s what your load required, without worrying about losing balance. Trike stability would have saved me a lot of lost skin because, as another site pointed out, a trike wouldn’t be so eager to send me skidding across the roadway in case of black ice, loose gravel, wet leaves, or chain skip.

HP Velotechnik Tadpole recumbent trike with fairing and rear panniers
Recumbent trikes were also reportedly pretty quick and potentially more comfortable over long distances. (Comfort would be less of a concern for those not attempting long distances per day — see below.) Recumbents were especially suited for fairings that would reduce wind drag. Various (e.g., 1 2 3 4 5) webpages presented or provoked numerous thoughts about full or partial fairings on upright bikes:
- a fairing would contribute to instability in a crosswind;
- fairings are noisy (presumably, they rattle) when hitting bumps;
- they can significantly reduce (by as much as 40%) the pedaling energy needed to maintain a given speed;
- speed records always involve bikes with fairings, though generally these appear to be fully sheathed velomobile-type bikes;
- wind resistance is not as much of an issue — thus, a fairing makes less of a difference — at low speed;
- fairings only help to block rain above approximately 13 MPH;
- rain and mist reduce visibility through a fairing;
- fairings contribute significantly to wind protection in cold weather (adding warmth roughly equivalent to one layer of clothes), but the reduction of cooling wind could mean a hotter ride in warm weather;
- a fairing shields against road debris thrown up by cars, and against bugs (including those that fly up the legs of one’s shorts, on a recumbent), and reduces the wind rumble that makes biking auditorily unpleasant;
- weights range from about 1.5 lbs. (for a partial fairing) to 2.5 lbs. (for a full fairing);
- a fairing can get in the way — making it harder to lock the bike, and potentially occupying the space and/or the connection points needed for a front rack and panniers;
- a fairing can be problematic in a crash.
I liked the idea of a recumbent bike for touring, but recumbents were hard to find and expensive. Walmart offered only cheap, absurdly powered tricycles; the cheapest of the seven models at Amazon cost $1,400; the results of a Google Shopping search concurred that recumbent trikes worth considering for distance riding started around $1,300, and brand names were not prominent; but there seemed to be some deals on eBay. Safety-wise, a recumbent could be too low for motorists to see in some situations, but at least a motorist could find it more difficult to nudge my handlebar deliberately, as a city bus driver in Bloomington, Indiana once did. Several (1 2 3) sources said that two-wheeled recumbents were harder to climb hills with: you can’t stand, so you go slower, and therefore you may wobble. Also, at higher speeds, on a recumbent, your seated angle can mean the wind is trying to pull your helmet off. Reduced wind resistance, sitting closer to the pavement, and sitting at a flatter angle mean more sunshine, more heat, and less wind cooling in the summer. Additional drawbacks to a recumbent: there is no place for a handlebar bag; a mirror is necessary to see clearly what’s behind you; it is less maneuverable; kickstands may not work well; and you are more likely to swallow bugs. A trike, recumbent or not, would encounter glass and potholes along three wheel paths instead of one. On the upside, recumbent distance riders praise the fact that, crashes aside, there is little to no risk of injury, sores, pain, or strain in the crotch, butt, back, shoulder, elbow, wrist, or hand, and there is less wind resistance and thus (especially downhill) higher speed. Having survived many crashes including a broken collarbone, I also appreciated that a recumbent rider would not have as far to fall before hitting the pavement.
It seemed the ideal solution would be to have a recumbent for touring and an upright for around town, and perhaps also for routes with many or large hills. But I wasn’t likely to spend the amount needed for a recumbent. I’d have to choose among upright options, and that posed the question: in contrast to an aerodynamic fairing, how fast were people going, really, on these bikes with fully loaded kitty-litter square bucket panniers? I noticed 1 2 3 sites with instructions on how to make them. Here, for instance, was the full-kitty rig belonging to Burch:

Mounted on a nice Trek, too. Was that going to be speedy? Another CyclingAbout (Alee, 2016) analysis, combined with 1 2 other Alee articles, seemed to reach the following conclusions:
- Minimalists favor weight reduction to increase speed, improve bike handling, reduce bike wear and tear, reduce the expense of mass transportation (e.g., taking the bike on a plane), and make it easier to carry gear (e.g., into a house or hotel).
- Extra weight makes the most noticeable difference in your speed when it tires you out — when, for instance, you are riding uphill or against the wind, or you are a weaker rider, or going a longer distance.
- Assuming you and/or your circumstances are not wearing you out, weight is not the most important factor in deciding whether to take something along on your ride. Rather, the key question is, Will I use it regularly? (Don’t be surprised if this question translates into carrying more gear on an overnight trip than on a three-month tour of Asia.)
- Wind drag tends to affect your speed more than weight does. Wind drag has more of an effect, in percentage terms, when you are traveling faster (e.g., flat terrain, less weight, shorter distance).
- If you are thinking about aerodynamics, you will probably not stop with a choice of more streamlined bags. You will probably also choose to ride in a more aerodynamic position, on a faster bike, with lighter weight.
Alee based those conclusions on several informal studies and experiments:
- First, he used BikeCalculator.com (see also Analytic Cycling) to calculate the effects of elevation, tire type, and other inputs, on a 100km (62-mile) ride with zero climbing at a pace of 19.4 MPH. For that hypothetical ride, Alee found that a 77-lb. load would take 2.6% longer (five extra minutes, on a 197-minute ride) than an 11-lb. load. The percentages would increase with more climbing: 8% slower if that 62-mile ride included some ups and downs; 15% slower on a more mountainous ride. For a 55-lb. load, the differences were smaller: 1.7%, 5.5%, and 10.5%, respectively.
- Alee also conducted a personal experiment. Maintaining a relatively constant energy output of 200w (as measured by a power meter) and taking the average of two tries, he rode a 9.6-mile course at a pace 7% slower with a load of 55 lbs. than with a load of 11 lbs. He believed this result was consistent with the BikeCalculator results. That was not entirely clear to me. It seemed hard to compare: his real-world route was shorter and less hilly.
- In addition, Alee compared the effects of switching from larger to smaller rear panniers. Carrying an 11-lb. load in both cases, over that 9.6-mile course, that reduction in wind profile increased his speed by about 2%.
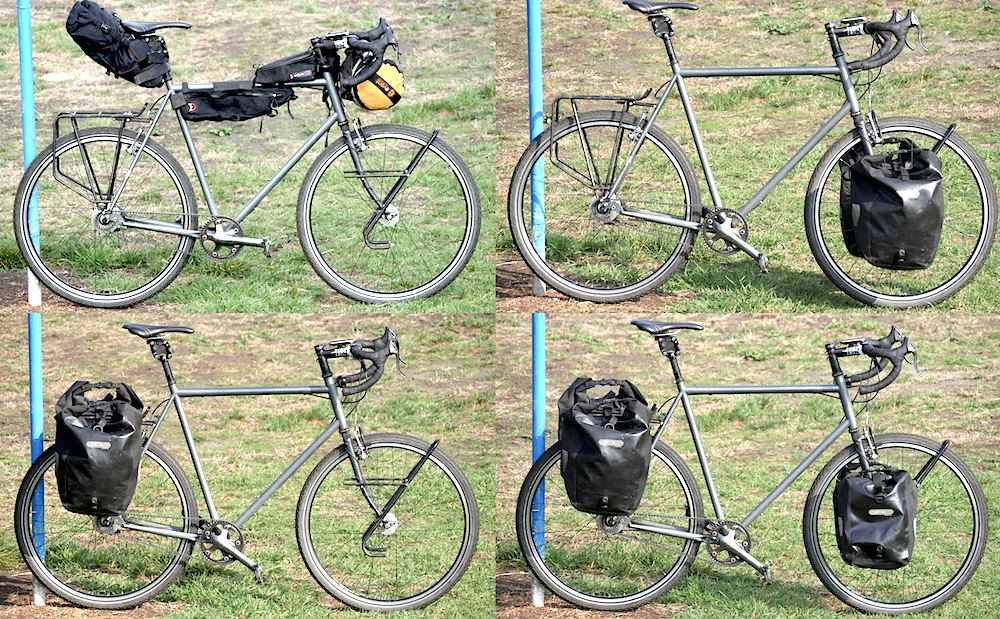
- Maintaining that same 200w energy output, he also compared average speeds when using only front panniers, only rear panniers, front plus rear panniers, and finally, bikepacking bags (i.e., saddle bag, half frame bag, top tube bag, and handlebar bag — see the top left image, below). Total weight was identical in all cases; apparently he made minor adjustments in bag contents to keep weight constant. In this test, the bikepacking bags were fastest. For the short distance he covered (about four miles), compared to the bikepacking bag setup, he calculated a slowdown of about 6.5% when using either front or rear panniers, and almost 8% when using both front and rear panniers. That 8% equaled a slowdown of about 1.5 MPH from his bikepacking-bags speed of 18.7 MPH.
Alee’s work seemed to agree with the distinction mentioned earlier: should I be trying to develop a light and relatively fast ride to wherever I was going, or should I look on the trip as more of a slog, with the benefit of being able to reserve cargo capacity for anything I might want to take along? If I understood him correctly, small differences in weight and wind drag would make more of a difference at the top end. Beyond a certain level of weight and/or volume, I might not really notice much of a difference. That was also the gist of 1 2 discussions: extra weight would be most bothersome going uphill, extra wind resistance (with e.g., bucket panniers) would be most noticeable when seeking speed, and either would become more of a burden over an extended period. Possibly this could be a matter of math vs. lived experience: the drop from an average speed of, say, 8 MPH to 7 MPH would be large in percentage terms, but might seem unimportant to the rider who has grown accustomed to just crawling along. Even so, I was becoming more aware that sufficiently massive panniers, in a sufficiently hostile headwind, could leave me nearly at a standstill.
In 2007, riding an upright bike at the equivalent of 20 MPH in the wind tunnel at the University of Washington, Jan Heine (2012) reached a number of academically researched findings, including these:
- On a road bike with drop handlebars, a full aero tuck (i.e., chin nearly at handlebars) reduces wind resistance by 38% compared to riding on the hoods (i.e., sitting up, elbows only slightly to moderately bent). No other studied factor made such a large difference.
- What you wear and how you position yourself on the bike has the largest impact on aerodynamics. Examples: raising the handlebars 3/4″ increases drag by 5%; wearing a loose- rather than close-fitting jacket raises drag by 8%.
- A handlebar bag is more aerodynamic than a seatbag that extends slightly wider than the rider’s hips.
- Front panniers (of the commercial rather than the bucket kind, presumably) are more aerodynamic than rear panniers.
- Fairings only decrease wind resistance if they are small and ideally positioned and the rider is in a full aero tuck.
- The rear part of a fender increases drag; but, overall, a complete set of fenders does not affect a bike’s aerodynamics.
- Both leading and following riders benefit from drafting.
Heine said the 1 2 published articles resulting from this research (each of which would have cost me $10) presented additional findings. I would have been particularly interested in what they said about an aerobar ($100+) as an accessory that might contribute to comfortable and aerodynamic tuck riding.
The Trailer Alternative
The more I contemplated a bike covered with square bucket panniers, the more I disliked the thought of myself as a turtle, crawling down the highway, permanently burdened with a load of crap. I hadn’t taken trailers seriously because they could cost a lot, and because I had talked to one or two distance riders who said they suck. But now I was wondering if I had been too hasty in opting for the beefed-up back rack.
A search led to various sources (especially The Cycling Canadian, Bicycle Touring Guide, Adventure Cycling Guide, Adventure Cycling Forum, LonelyPlanet, Dave’s Travel Pages, CycloCamping, TomsBikeTrip, BentRider, and 1 2 3 pages at CrazyGuyOnABike) that tended to agree on certain tradeoffs, between trailers and panniers. Here is a consolidated list of factors and views provided by those sites, with some additional comments from my own perspective:
- For both distance riding and local cargo hauling, a trailer tends to offer more weight and volume capacity, although (depending on the trailer) four bucket panniers plus racks might carry more volume if not weight. This could matter, not only for those who prefer to take a lot of gear, but also when crossing or camping in places without much food or water. A trailer would also be more likely to accommodate large items, such as a wilderness hiker’s backpack, though I believed I could attach mine on top of the crates, on the back rack I was planning.
- A trailer (especially a two-wheel trailer) would keep weight off the bike frame and wheels, reducing the risk of having to push a bike with a broken spoke and the expense of wheel repair or replacement. But more than one source insisted that trailers actually cause more broken spokes. Tom Allen claimed that lightweight road and hybrid bikes were especially poorly built for the “abnormal amount of frame flex” a trailer would induce, leading “quickly to metal fatigue and breakage.” I did not encounter others confirming this opinion, aside from one source agreeing that this could be a problem, but only with heavy loads on single-wheel trailers.
- Taking weight off the rear wheel and putting it onto a trailer could be unhelpful where, especially on gravel and/or uphill situations, the rider might actually want more weight on the rear wheel, so that pedal cranks produce traction rather than just a spinning rear wheel. It was also reportedly unhelpful to have weight off the bike tires when braking. Note also the potential advantages of disk brakes over rim brakes with heavy loads, especially in wet conditions.

BOB Yak with small U.S. flag
- The bike would ride more stably and/or with better balance with a trailer on back than with the weight on the bike’s racks and panniers. Exceptions: one-wheeled trailers could take some getting used to (though some said they could also feel more natural); specifically, they could make it nearly impossible to ride off-saddle (i.e., standing to pedal, as when going uphill — although one source said panniers were more wobbly at low uphill speeds). Generally, there were complaints that trailers could be difficult on gravel tracks, could fishtail (especially when heavily loaded) at speeds above 25-30 MPH, and could cause jackknifing (i.e., could push the rear wheel sideways) in corners, sudden turns, or hard braking, including downhill emergency stops. One source contended that, at least for two-wheel trailers, the fishtailing or “pushing” effects going downhill were due to poorly designed trailer hitches, not to the trailers themselves. Most but not all users of BOB Yak trailers testified to great handling, even at high speeds. I suspected that, for some trailer designs, as with a car trailer, the front-vs.-rear distribution of weight in the bike trailer could affect fishtailing.
- In my reading, all but one of the commenters who mentioned the issue felt that panniers were worse (sometimes much worse) in crosswinds, and were more affected by the wind from passing trucks. One, describing the experience of a group split roughly in half between BOB trailers and full (i.e., four) panniers, with the wind coming in from a roughly 10 o’clock angle at gusts up to 50 MPH, said, “[A]ll the BOB’s made it in and none of us with panniers did. Those with pannier were blown all over and off the road.” Another said, “[A]dd a cross wind or the need to adjust your direction quickly, and you will find that the extra weight, above or behind the center of gravity, can easily create an unsafe situation. . . . Our latest crash involved the only bike in our group equipped with panniers. . . . [P]anniers would never be our first choice unless the extra cost made a trailer out of the question.”
- If one’s choice of bikepacking bags included a frame bag that would substantially fill the long, narrow space below the top tube, then it seemed that frame bag would function as a sail, producing great instability in crosswinds. Otherwise, though, one source reported that, in his experience, a bike with bikepacking bags (but not panniers) functioned well even in “insane” crosswinds.
- The discussion of fairings (above) suggested that the wind drag introduced by any cargo device — trailer, panniers, or packs — could be reduced somewhat by paying attention to how they were shaped and where they were located on the bike.
- Two-wheeled trailers carry more cargo than one-wheeled trailers on pavement, but could be unusable on narrow single-track paths.
- Instead of steering a single wheel track around potholes and other road surface problems, a two-wheel trailer requires you to steer three separate wheel tracks around such impediments. In other words, your three wheels, combined, will hit more glass, potholes, etc.
- A two-wheeled trailer is at risk of tipping over in tight or sudden turns, or when only one wheel hits a rock, bump, curb, or pothole, even at low speeds.
- Depending on model, trailer fishtailing and flipping might not always mean the bicyclist hits the pavement. The hardware itself would not necessarily require that. For example, one source, describing his preferred type of trailer, said, “[T]he bendy ‘lollipop’ hitch means you can lay the bike down without unhitching it.” Another spoke of a “hairy” situation that he evidently survived without crashing, when the trailer jackknifed.
- There could be a visibility issue. Someone said that, several times, drivers almost ran over his trailer because they couldn’t see it. The scenario was apparently that he didn’t have a flag on it and he was crossing directly in front of their big vehicle, where they could only see something tall enough to rise above the front hood of that vehicle.
- When going into a building (e.g., motel), it could be easier to roll a trailer than to carry panniers, the contents of crates, and other items that were strapped onto the bike. On the other hand, depending on the size of the load and the nature of the destination, it might be possible to get the bike plus panniers inside a building, and even pushed or lifted up stairs, across streams, or over fences in one trip, whereas (especially for trailers with small wheels) bike plus trailer plus cargo could require multiple back-and-forth trips.
- Aside from the bike itself, there would be no risk of theft if you could carry your panniers with you, when leaving the bike behind and going indoors (into e.g., a store, theater, or library) or setting off on foot for backcountry camping. You would not even need to take the panniers along if they were square buckets that nobody would want to steal. But the trailer would tend to remain behind, in such situations, and would thus tend to be a target for thieves. Of course, anything left behind would be vulnerable to vandalism.
- Once the trailer was disconnected, the bike would be available for burden-free local travel around camp or city streets, without a lot of hassle to remove various bags and other items.
- Configuring the bike for front and rear racks and panniers could be more complicated than configuring it for a trailer capable of hauling comparable amounts of cargo.
- On front and rear, racks and one or both panniers could be added or left behind as needed, according to the nature of the trip, and would not necessarily always impose maximal weight and wind resistance, whereas (depending on trailer design) even an empty trailer might always have the same wind profile and impose a larger weight penalty, estimated at 15-20 lbs. total (i.e., 10-15 lbs. more than empty panniers and rack).
- The contents of individual bike bags would tend to be more organized than the contents of one big trailer bag, but would take longer to pack and arrange.
- Some argued in favor of minimal panniers, rather than trailers, on the grounds that the more cargo capacity you have, the more stuff you’ll take along and the more weight you’ll have to drag down the road.
- It could be a hassle — but highly advisable, especially on front — to insure that left and right panniers were approximately balanced in terms of weight.
- Panniers were mechanically simpler, could be far less problematic (especially on bad roads), and required fewer parts, with the possible exception of do-it-yourself racks and panniers that might need repair or replacement. In particular, trailer frames could be damaged; and unless the trailer wheels were the same size as the bike wheels (as in the ExtraWheel, consisting just of a third wheel, with racks to support another set of panniers), it would be necessary to carry another spare tire and tube — and, for lower-quality trailers, a spare wheel, hub, and/or spokes as well (because spares for some trailer wheel sizes can be hard to find), and also possibly more tools. Quality trailers were especially recommended for people preparing for extensive bike travel.

ExtraWheel
- Unlike panniers, a trailer would present no problems of heel clearance while pedaling.
- Any trailer, but especially those that can’t be folded or easily disassembled, would be more of a hassle and expense when using mass transportation. But it is possible to dismantle an ExtraWheel so as to fit inside a bike shipping box with the bike. A rider who planned to rent or buy a bike in the destination city, rather than carry his/her bike along on the bus or plane, might find it easier and more flexible to add a hitch and trailer than to attach racks and verify pannier-heel clearance.
- A trailer might be more expensive than sets of racks and panniers. It would surely be more expensive than bucket panniers.
- Some said that trailers (especially two-wheel trailers) imposed greater rolling resistance, and made everything feel slower and heavier. But others agreed with the feeling that a bike with loaded racks and panniers felt like a “pregnant elephant.” Roughly consistent with Alee’s findings for panniers (above), one source reported an average loss of speed of about 1 MPH with a trailer. That did not seem consistent with the reports that trailers would offer noticeably less wind resistance than panniers. But possibly those reports involved larger panniers.
- On hills, multiple sources said a trailer could feel like it was dragging you backwards when climbing. One source recommended having a 32- or 34-tooth gear on the cassette (i.e., rear wheel sprocket). The stock cassette on my Trek hybrid went to 32, but it had since been replaced. I had to count the teeth on my current cassette to verify that it was a 32.
- On hills and other uneven surfaces, a trailer could be difficult to keep still when parking. (Suggestions: block the wheels; use a strap to keep the handbrake compressed.)
- There were a number of complaints about how a bike plus trailer would be much less maneuverable (e.g., turning around in a tight space; backing up) and more difficult to park.
- If the trailer didn’t come with a dry bag, its non-waterproofed contents could get soaked or muddied, or might conceivably float away, when crossing spots where streams flow onto roads after a rainstorm, not to mention actual stream crossings, whereas the contents of higher-mounted or waterproof panniers would stay dry.
- The contents of some bike bags could be more accessible while riding, or without completely parking the bike, than in a trailer.
- It could be easier to push a bike with panniers, except maybe if they were buckets that protruded far from the side of the bike — especially in mud, sand, or other conditions where the trailer could function as an anchor.
- Panniers must be removed, crates must be emptied, and lashed-on items may have to be untied, in order to repair flats and perform maintenance on the bike.
- Trailers may or may not be wider than bucket panniers, but are surely wider than ordinary panniers.

An adequately loaded Burley Nomad (front wheel control optional)
- A two-wheeled trailer requires you to ride noticeably further out from the edge of the pavement. One source estimated needing a total of 3.5 to 4.0 feet — or even a bit more, if there was a sharp drop-off on the right. Then again, having had vehicles hit my handlebars and also come so close as to force me off the road, I was not sure I would want a vehicle passing closer than 2′ from the center of my handlebars. Some drivers might respond to this bigger object (i.e., bike plus trailer) by taking more notice and consciously changing lanes away from you, rather than try to squeeze by you in the same lane. Sadly, at least in the U.S., some are apt to take this as an unacceptable intrusion into the automotive domain. One or two sources reported that drivers seemed to give more room around his trailer draped with a flag — an American flag, especially. One rider said, “This [i.e., needing more of a lane] was the biggest issue on this tour, but I soon got used to it. The flag gave me peace of mind.” On this point, I was about to get an education. I already knew that, as Antranik said, riding on sidewalks is “a horrible idea,” “extremely stressful,” “very scary,” illegal in some cities, and flatly dangerous. But now I was about to discover that I should have been riding much more assertively in the highway — and I realized, upon reflection, that doing so might have protected me on two of the three occasions when I got hit, and on all of the occasions when I had been driven off the road, though no doubt it would trigger hostility from a certain percentage of extremely aggressive drivers, though hopefully mostly in urban settings where I did not intend to do a lot of biking. Keri Caffrey offered a convincing video demonstrating that the bicyclist who rides in the right tire track (never mind the very edge of the road), rather than taking the center of the right lane, actually invites drivers to come too close and, as a result, dramatically shortens the amount of time before some drivers will even see the bicyclist. (Note: state laws may require the bicyclist to ride near the right edge, but may make exceptions — where there are surface hazards, animals, and parked vehicles, for example, or where the lane is too narrow for a bike and vehicle to travel safely side-by-side. See also Vulnerable Road User laws.) A search led to 1 2 3 4 5 6 sources advising bicyclists to “ride big” and contending that, as AZBikeLaw and its quoted sources put it,
When a road is too narrow for cars and bikes to ride safely side by side, bicycles should take the travel lane, which means riding in or near the center of the lane. . . . Most [Motor Vehicle Codes] allow them to leave the right side [of the roadway] when . . . riding too close to the roadway edge would encourage a driver to pass despite having insufficient room. . . . Cyclists should ride in the center of narrow lanes and just to the right of cars in wide lanes. . . .
On busier roads with just one lane in each direction, you may have to be more assertive and take the lane by riding in the center of the lane. By doing this you’re communicating that motorists will have to wait behind you until it’s safe for them to cross into the other side of the road. . . . [I]f motorists can tell from farther away that they can’t squeeze past you . . . they’ll be able to plan their lane change earlier, causing less frustration and increasing safety for both parties. . . .
Most traffic lanes are too narrow to safely accommodate a motor vehicle and cyclist side by side. Cyclists who keep right so motorists can pass them without changing lanes actually encourage close passes and sideswipes. . . . It may shock many to learn that a 12-foot-wide lane is considered a “substandard width” . . . . [Elsewhere, AZBikeLaw observes that, when deciding whether a lane is wide enough to accommodate bicyclists and vehicles side by side, the relevant vehicles are “the largest trucks and buses allowed on any road, which with mirrors can be 10 feet wide or more.”]
- On a two-wheeled trailer, the tire closer to the edge of the pavement will run more often in the gutter, and thus is more likely to encounter glass and nails.
- Some trailers can be used as camp furniture (i.e., table or seat).
- A trailer would prevent any other rider from following in your slipstream.
- Aggressive dogs reportedly tend to chase the trailer rather than the bike.
- While it could be a hassle to park a bike with panniers if there’s not a tree or post to lean it against, I discounted that because I had decided I would probably get a double-leg kickstand (~$20), like the one shown in the photo of Burch’s full-kitty rig (above). But then someone pointed out that any kickstand would work best on level pavement or firm, flat ground, and I wouldn’t always have that.

Burley Travoy with cargo
Processing the Information
The preceding materials suggested that one’s decision, in the perennial trailer vs. panniers debate, could be influenced by a variety of personal and situational factors. For my purposes, at least, it seemed I might be able to boil down the many foregoing observations to a few core issues:
- Choice of trailer type. In the trailer vs. pannier decision, it seemed I should start by deciding which kind of trailer I was talking about. It looked like one- and two-wheel trailers were rather different on a number of points. My search for the best online bike stores led to a list of 35 stores, predominantly in the U.K. Among those 35, about half were blocked by a Firefox browser security add-on that I decided not to override. Not many of the others offered cargo trailers. Those that did seemed to emphasize Burley two-wheel trailers (including the flatbed), secondarily Topeak, Weehoo, and Surly Bill. Similarly, in the U.S., REI offered the Burley Travoy and Nomad; and among Amazon’s cargo trailers (among which the only names I recognized were Burley and Maya), the Travoy was the only one achieving an average rating of at least four stars from a respectable number of users. Performance Bicycle and Nashbar (now both owned by ASI) collectively offered only one trailer, a single-wheel Topeak. Bikeparts offered a selection of BOB, Burley, and Surly Bill trailers, among which only the BOBs were single-wheel. CyclingAbout listed what it considered the “16 best bike trailers for bicycle touring,” noting that most were single-wheel “because they are generally narrower, lighter, have a lower rolling resistance, are more manoeuvrable (as they lean with the bike), have one less wheel to puncture and can better avoid potholes.” Among names that others (above) had mentioned, those 16 included BOB, Burley, ExtraWheel, Maya, and Topeak. Here, again, the Burleys were the only two-wheelers. CyclingAbout noted that BOB trailers were most popular “due to their relatively low cost and good build quality.” I decided that, if I went with a trailer, my choice (at least on a trial basis, purchased from Walmart for ease of possible return) would be a BOB Yak, currently selling at about $290 — and that I would probably be wise to pay another $100 for the recommended backup parts (i.e., spare wheel, tire, tube, and Mr. Tuffy tire liner). Note also the endless possibilities of customization.
Cycling Savvy says, “This is the width of a typical lane with vehicles drawn to scale. None of the above vehicles are able to give the required 3ft of passing clearance without changing lanes. A cyclist is far more likely to be sideswiped than run over.” I would say “sideswiped or driven off the road.” The statistics don’t necessarily support that, but the statistics may not be right: it appears that crashes not resulting in hospitalization or death are often not reported, even by police.
- Personal safety. The discussion of bike injury statistics in another post made clear that biking was risky. The question at hand was whether the choice of panniers or trailer — indeed, of trike and/or two-wheeled trailer — would make any difference in that. It seemed that I might enhance my visibility by presenting a larger rear profile. That is, maybe it would be safer to combine big bucket panniers with a lightweight but voluminous load on top of the back rack (consisting of e.g., a plastic crate carrying chips and a jacket, plus a backpack on top), along with a big, waving flag and flashing lights even in the daytime. For some drivers, such a load might not just be more visible: it might also make it seem more reasonable that I would be using *their* road, although there was a countervailing possibility that a trike, especially, would seem very liberal in some regions. At best, this sort of rig might qualify to be treated as something like a horse-drawn buggy, though that would not necessarily be the safest thing either. I might even seem to have a reason not to be riding at the very edge of the pavement — which, in itself, would reduce the risk of accidental veers into the ditch, and of flat tires due to the accumulation of nails and glass in places where car tires did not travel. Riding a few feet inside the traffic lane, rather than at its edge, might also discourage motorists from trying to squeeze past me without crossing the center line. What scared me about that sort of squeezing maneuver — speaking, again, from experience — was not just that they might hit me, injuring or killing me on impact, in the fall, or in finding myself under their wheels, or those of the vehicle behind them. It was that they might merely be so close as to force me off the road — or, especially for big trucks, that the wind from their passage might be enough to set my bulky load off-balance, at a place where that could be disastrous. I posted a question on that and, at this writing, had received one note expressing agreement with some of this reasoning. And yet, in a land of hills and curves, and on busy roads where there might be worries about what drivers of following vehicles could see, a speeding driver’s last-minute options might be limited to (a) squeeze past or (b) hit me. In that scenario, I’d be favoring a two-wheeled bike with a one-wheeled trailer.
- Bike wear and tear. This was the issue that got me started on trailers. My impression was that a heavy load would wear down the wheels, but virtually nobody had expressed firsthand experience of mount points breaking off from excess load. Even if that had been a frequent problem, there would still be the option of mounting a back rack on the axle rather than on the eyelets. To keep the center of gravity low, I would want to put heavy items in panniers or trailer, rather than on top of the front or back racks; but of course panniers themselves would hang on the racks. If I didn’t overdo it, it seemed my bike would be fine with either that approach or a trailer. I emailed Trek, my bike’s manufacturer, on the question of whether a trailer or heavy rack and panniers were best for this aluminum frame. Here was my question and their reply:
Dear Trek: I have a Trek 7.3 (2008). I am thinking of traveling. I face a choice: heavy panniers and back rack, or a loaded trailer. Someone was saying that hybrids (esp. w/aluminum frame) are not suited for trailers — that they will soon experience metal fatigue. True?
Hello Ray,
I do not believe this to be true. You can safely use whichever method you prefer–trailer or racks with panniers. My personal preference is pannier and racks since trailers are a whole additional device that requires maintenance. However, trailers are more versatile in what you can carry. So depending on how far you’re going, for how long, where you’re going, and the type of terrain you want to tackle. I would say that there are strong benefits to both.
- Speed. Wikipedia said, in effect, that (a) depending on conditions, biking produces three times the speed as walking for the same amount of effort; and (b) weight reduction makes virtually no difference on the level, but contributes directly to reduced power need in steep climbs (or, presumably, against the wind) (e.g., reducing weight by 10% reduces effort by 10%). A search led to a Reddit discussion suggesting that — depending on such factors as fitness, age, type of bike, quantity of camping gear, road surface, wind, and terrain — longer distances (80+ miles in a day) tend to wear people down and make the biking less enjoyable; short distances (<30 miles) may be the most fun and/or make sense if you’re in an area where there’s lots to see; 40-70 miles (or 40-60, according to Bicycle Touring Pro) is most typical. Reddit and 1 2 3 other discussions tended toward an estimate of 10-12 MPH for non-racers carrying loads, counting short breaks. That was probably about what I had averaged in my most ambitious bike camping trip: 195 miles in two days, riding long hours on a hybrid, on the crushed limestone of the 240-mile Katy Trail in Missouri. In the last few years, in conditions of moderate hills and/or mild wind, my round-trip speeds with no cargo, on rides of 20-30 miles, had mostly ranged from about 15 to 17 MPH, usually hitting a few stop lights. On similar rides, in conditions of big hills or stronger winds, I had ranged from roughly 13 to 15 MPH. Taking 15 MPH as a midpoint, the information presented above did suggest that I should expect to lose more speed with fatigue — in particular, with increased distance. So maybe 13.5 MPH would be a fair estimate of my present average speed, without cargo, on a 50-mile ride.
- Weight and wind resistance. I did not expect to buy expensive ultralight equipment. In addition, based on my car camping experience, I expected that I would tend to carry the gear that I might need to be relatively prepared for unexpected conditions: a little extra water, for instance; more variety in food; clothing for varied conditions. Thus, Alee’s experiments (above) made me think I should expect to lose maybe 2 MPH from wind drag and added weight, if I used a trailer or, alternately, ordinary front and rear panniers, which would probably be fully loaded. That would reduce my average speed, on a 50-mile day, to 11.5 MPH. I saw that Brian Huntley had toured all over eastern North America with four kitty litter bucket panniers. No doubt the wind resistance of all those buckets could significantly reduce wear on one’s brakes, when coming down hills. I’d be looking at maybe 10 MPH on average, for 50-mile rides. In other words, my bike at 15 MPH, subtracting only 1 MPH for a minimalist load, would be an estimated 40% faster than my bike with full kitty. In at least one scenario, Europe Bicycle Touring similarly estimated a 40% difference between unloaded and fully loaded.

Strava Heatmap of the continental U.S.
- Travel route. It seemed that it would be helpful if I had a clearer idea of what kind of trip I was planning. In the past, especially along the Katy Trail, I had been able to just load the panniers, strap the camping gear (i.e., tent, sleeping pad, sleeping bag) on top, and take off for a few days of bike camping. Only once had I attempted any significant distance on highways, and that was a trip from my parents’ home to Detroit (~250 miles total) in the 1970s, for which I took only a sleeping bag, tied to the handlebars. Presently, I was vaguely thinking of a trip, 200 miles each way, with several days of camping at the far end and a few days en route, as a shakedown run for a later, still hypothetical meander of uncertain direction and duration. (Whether that later trip would happen was uncertain: I had previously started to plan rides in Michigan and Mississippi that didn’t pan out.) My thoughts on safety (above) posed the question of whether my shakedown route could consist of quiet country roads and/or roads with shoulders, such that I was free to choose any cargo setup — or whether, instead, I needed to be thinking about scary instances when I’d be sharing a narrow road with drivers who might not see me until the last minute. Where I was going did not seem to be on any lists of well-known (and presumably fairly safe) bike routes. It was not, for instance, on the Adventure Cycling Association’s Bicycle Route System. Indeed, it barely registered on the Strava Heatmap — meaning that I would probably not be encountering many bicyclists “in the know” during my trip. The best I could do, for this trip, was apparently to piece together a solution using Google (maps, Earth, and Street View) and FreeCampsites.net. On that basis, it appeared that, aside from the unknowns of some urban sections, this route would generally be pretty safe. Since I wasn’t sure this would lead to any longer trips, I decided that it might not make sense to spend hundreds on a long-distance trailer that I might never use, or on high-quality front and rear panniers and racks. This was just going to be a trial of the general concept. I already had the buckets. It seemed I should go ahead with my original plan, of making my own back (and possibly front) rack, and should then explore the project of constructing bucket panniers.
- Travel versatility. Looking at the bike route brought to mind the remarks (above) about the struggles of hauling bike, panniers and/or trailer onto trains, planes, and buses. Thinking about the proposed route for my shakedown trip, I encountered a variation on this theme that I had not seen elsewhere. It seemed that my bike trip would be a lot easier and safer if I just took the bus. Seriously, there were some urban segments, some of which were not bike-friendly, and the city buses did have bike racks on front. So, a problem: if I did decide to take a bus, on this or any future trip, would my bike fit into its rack? Probably not with bucket panniers. The scenario was that I would take them off while waiting for the bus, and then be ready to put the bike in the rack on front and haul the panniers and other back-rack items onto the bus. Then I would have to hustle them off the bus at my stop. This thought encouraged me to try to get by with two rather than four bucket panniers. It also presented the mental image of me trying to drag a fully loaded BOB trailer onto a bus. I guessed it could be challenging.
Those appeared to be the key concerns arising from the foregoing materials about trailers. It seemed that I had a tentative plan. Now the task at hand was to buy or build the rack and panniers.
A Possible Next Step
As just noted, I decided that my next step would be a shakedown trip of about 400 miles round-trip. It could range from a week (if I really flew, and didn’t feel like hanging around in any of the campgrounds) to two or more weeks (if everything was good and I decided to go farther). If I could use city buses for the urban sections, out and back, then this trip would consist almost entirely of rural riding. Google Street View seemed to say there was not much traffic on the chosen roads. So I could probably travel with relative comfort at least in the right part of the traffic lane, when there wasn’t a good shoulder. Most of this would be relatively flat land, with only mild hills. I wasn’t planning an extended expedition into the wilderness, and thus would not be taking extra food and water.
As such, this trip would not necessarily be the best test for a really loaded bike. Moreover, I was inclined to pack on the light side — to squeeze it all into two rear bucket panniers, if possible, so as to avoid the time and expense of devising a front rack and panniers. Nonetheless, I expected that the trip would test my appetite for distance biking, and would thus help inform potentially costly decisions about acquiring high-quality racks and panniers, a trailer, a recumbent, or a trike.

So the question at hand was, how should I set up my rear rack and bucket panniers? Unlike the Brian Huntley setup shown here, I did not already have what appeared to be a Voyager (or now, apparently, Evo) Explo-Rack, which different sources rated at either 50 or 88 lbs. capacity. So I couldn’t just attach hooks to the buckets and be done. I could buy an Explo-Rack for $36. But there were some potential drawbacks to that approach: heel contact, on my bike, because the panniers would not be far enough back; no organized way to protect my laptop or other items from theft, if I tied up the bike and went into a store; a mess, if I got a flat and needed to turn the bike upside-down, but had my tent and sleeping pad tied onto the rack.
An example of an organized system: put my laptop and other valuables into my big backpacker’s backpack; attach my tent, sleeping, pad, and other long items onto that backpack vertically; and then clip the backpack onto the top of my bike rack. Then, if I needed to go into a store (unless they had a policy against backpacks), I could lock up the bike and carry the backpack with me, without a lot of time and effort to transfer my valuables to the backpack out in public. For this trip, I didn’t need my big backpack. But I could use my smaller school-style padded backpack in the same way. I would just figure on putting it into a plastic crate, on top of the rack, and clipping it in, hoping that the crate would provide some protection in case of a crash.
I also wanted a second plastic crate on top, as noted earlier, for loose items (e.g., chips, jacket). In a change from my earlier concept, I was now inclined to put those two crates side-by-side, one over each bucket pannier. At the price of some additional wind resistance, this would present a wider road profile, so as to establish a better claim to a share of the roadway (above). Surprisingly, I would not actually be taking much more lateral space: the crates would stick out only a few inches, on each side, beyond the ends of my hybrid-bike handlebars. But, of course, I would rather have drivers see that more noticeable wall-like rear profile, perhaps festooned with flashing lights, than to overlook the handlebars and think that my bike was only as wide as my body. (Being tall and skinny wouldn’t help in that regard.)
There was one other thing. To board a bus or change a flat tire, ideally, I would be able to remove the whole thing — crates, panniers, and strapped-on items — as a single unit. Granted, this unit might be awkward if not impossible to handle, especially if the panniers were fully loaded. I would have to bear that in mind when planning my trip and packing my gear.
So that was the concept I wound up with. But at this point, two things intervened. First, it was winter, and I didn’t intend to go on this trip until warm weather returned, so I postponed further work on the project. Second, during that pause, I found my thoughts returning to the safety issue, and to the larger goals that fed this idea of going on a bike journey. Another post develops those thoughts.

